

Tutorial #44 - This: ![]() to this:
to this: ![]() recreating this:
recreating this: ![]() using Gimp. Translatable.
using Gimp. Translatable.
Requested by Daylight.
I know it's not perfect, but I think it's just missing a texture. I'm pretty sure there was another one on it, but I can't remember what one it was.
Open and prep image/base (crop, scale, etc.).
Add a fill layer of color #ffffff, set it on Soft Light at 100%. Add a layer mask, copy and paste the background layer into it. Now invert the layer mask. Duplicate that layer.
Duplicate the base layer, bring it to the top and set it to Soft light at 100%. With that layer selected, go to Colors>Color Balance and input these settings...
Shadows: +25, -15, +15.
Midtones: -75, -25, -50.
Highlights: +25, +20, +20.
Make sure that Preserve Luminosity is unchecked.
If you're happy with that, click ok.
Flatten the image.
Duplicate the base layer and go to Colors>Curves. Input these settings...
In the Value channel - X: 134, Y: 97.
In the Red channel, grab in the bottom left corner and move it to X: 0, Y: 28. Now grab in the upper right corner and move it to X: 253, Y: 232.
In the Green channel, grab in the upper right corner and move it to X: 243, Y: 255.
In the Blue channel, grab in the bottom left corner and move it to X: 0, Y: 50. Now grab in the upper right corner and move it to X: 243, Y: 255.
Click ok.
Duplicate the base layer and go to Colors>Components>Channel Mixer and input these settings...
Red channel: +130, -30, 0.
Green channel: 0, 100, 0.
Blue channel: -30, +35, +100.
Make sure that Preserve Luminosity is unchecked. Click ok.
Duplicate the base layer again, bring it to the top and set the layer mode to Color at 100%. With that layer selected, go to Colors>Components>Channel Mixer (again) and input these settings...
Red channel: +150, -25, -15.
Green channel: +10, 100, 0.
Blue channel: -5, +20, +85.
Make sure that Preserve Luminosity is checked. Click ok.
Flatten the image.
Go to Colors>Color Balance and input these settings...
Shadows: +15, +5, +10.
Make sure that Preserve Luminosity is checked.
Click ok.
Go to Filters>Enhance>Sharpen and sharpen it to your liking.
It now looks like this: ![]()
Add this:  (credit: Daylight) set it to Lighten Only at 25%.
Add this: 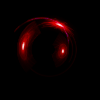 rotate it 90 degrees to the right and set it to Screen at 100%.
Add this: 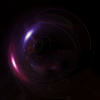 flip it horizontally and set it to Screen at 100%.
Add this:  flip it horizontally and set it to Screen at 50%.
Add this: 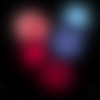 position it to your liking and set it to Screen at 50%.
Add whatever else you want! I added text (the font is Arial Bold Italic), and also blurred the top part of the icon.
I ended up with this: ![]()
You're done!
Please do not copy exactly.
Some examples of similar coloring: ![]()
![]()
--- flambeau
President of the Manalive Conspiracy
Founder of Team Hoodie
Icon by me
Posted : September 24, 2009 11:51 am

Tutorial #17—China White Coloring
Requested by Gymfan15
Made in GIMP, fully translatable
Going from this:  to this:
a recreation of this: 
PM me if you have any questions!
~Wunder
"The task of the modern educator is not to cut down jungles but to irrigate deserts." ~ C. S. Lewis, The Abolition of Man
Forum 1.0: 1303 posts
WC: 42
Posted : September 24, 2009 12:16 pm
Tutorial #45 - This: 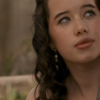 to this:
 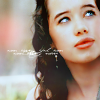 recreating this:
 ![]() using Gimp. Translatable.
using Gimp. Translatable.
Requested by H.M. Swanwhite and Wunderkind_Lucy.
Open and prep image/base (crop, scale, etc.).
Duplicate the base layer and go to Colors>Auto>White Balance. Set the layer mode to Screen at 100%.
Duplicate that layer, set the layer mode to Soft Light at 100%.
Add a fill layer of color #2a1409, set it to Subtract at 100%.
Flatten the image.
Duplicate the base layer and go to Colors>Components>Channel Mixer and input these settings...
Red channel: +120, -40, +10.
Green channel: -10, +50, +70.
Blue channel: -40, +50, +100.
Make sure that Preserve Luminosity is unchecked. Click ok.
Set that layer to Soft Light at 50%. Add a layer mask, copy and paste the background layer into it.
Duplicate the above layer and set it to Screen at 100%. (It should already have a layer mask on it. Invert the layer mask.)
Add a fill layer of color #ffffff, set it on Soft Light at 50%. Add a layer mask, copy and paste the background layer into it. Now invert the layer mask.
Add a fill layer of color #2a1409, set it to Screen at 100%.
Add a fill layer of color #2a1409, set it to Soft Light at 100%.
Flatten the image.
Go to Colors>Color Balance and input these settings...
Shadows: -10, 0, +10.
Midtones: +15, 0, -5.
Highlights: +5, 0, 0.
Make sure that Preserve Luminosity is unchecked.
If you're happy with that, click ok.
Go to Filters>Enhance>Sharpen and sharpen it to your liking.
Select the Blur/Sharpen tool, and selectively blur her face and neck and sharpen her eyes.
It looks like this now: 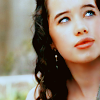
Add whatever else you want! I added some light textures and tiny text and ended up with this:
You're done!
Please do not copy exactly.
--- flambeau
President of the Manalive Conspiracy
Founder of Team Hoodie
Icon by me
Posted : September 27, 2009 3:56 pm
TUTORIAL #5
USING COREL PAINT SHOP PRO X
TRANSLATEBLE
Going from this: to this:
requested by MissAdventure 
Okay, were working with a really dark base here, and were not going to lighten it up much until the end, with the exception of a screen layer at the beginning. So the icon isn't going to look that pretty until the end.
1. Duplicate your base and set it to screen.
2. New channel mixer layer
Red layer only.
Red: 109
Green: -30
Blue: -9
Constant: 11
3. Duplicate the base layer and bring it to the top. Set it to luminance(legacy)
4. Merge everything. Duplicate your base and set it to screen.
5. Duplicate the screen layer and set it to 80% opacity.
6. Add a new color layer #404040 and set it to lighten, 100%. 
This gives it a very cool faded, magical look.
7.(Optional) I sharpened it to about 70%, but you don't have to... it all depends on the picture.
You are done!
Other examples of coloring(with small adjustments)


Proud member of the Hawk Nelson Club!
Avi by filmowe on livejournal.
Posted : September 28, 2009 3:57 am
Tutorial #18—Bluish/Reddish Coloring
Requested by narniagirl90
Made in Photoshop, fully translatable
Going from this:  to this:
PM me if you have any questions!
~Wunder
"The task of the modern educator is not to cut down jungles but to irrigate deserts." ~ C. S. Lewis, The Abolition of Man
Forum 1.0: 1303 posts
WC: 42
Posted : September 28, 2009 4:16 am
GIMP Tutorial #7. May be translatable.
Requested by H.M. Swanwhite.
From this  to this
  recreating this
  . It's not exact, sorry!
Open up your image and crop/scale (I’m using a screen-cap from SpareOom.net). (My cropping on the recreation is a guess, it may not compare well )
Duplicate your base and set it to screen 100%. Add a new layer from Visible (Layers>New from Visible) and set it to Soft Light 100%. Flatten image. (Here, the white speck on his armor was bothering me so I smudged/blurred it out of existence. )
Add a fill layer of 170920. Set it to Screen 100% and duplicate it twice (resulting in three Screen layers. Set the top layer to Subtract 100% (resulting in 2 Screen layers and a Subtract layer on top). This is the same as a single layer of Exclusion in other programs. Add a fill layer of f0e7ee and set it to Burn 100%. Flatten image.
Duplicate base and open up the Hue-Saturation (Colors>Hue-Saturation). Input these settings:
Master Hue: -5,
Red Sat: +30,
Yellow Sat: -30,
Cyan Sat: +100,
Blue Sat: +100.
Set the layer to Lighten Only 100%
Add a fill layer of 000d2f. Set it to Screen 100% and duplicate it twice (resulting in three Screen layers. Set the top layer to Subtract 100% (resulting in 2 Screen layers and a Subtract layer on top). Again, this is the same as a single layer of Exclusion in other programs. Flatten image.
Repeat the above step (with 000d2f). Add a fill layer of f0e7ee and set it to Burn 50%. Flatten image.
Optional: On the recreation I duplicated the base and set it to Multiply 20% (The only way I could get it a darker and less blue color.) As I look at them now, that may not gave been necessary. Maybe 10% would have been better.
Add this texture  (sorry, don’t know who made it) and set it to Screen 100%. Move it over to the bottom right corner (just covering his shoulder).
Add this frame  (by flambeau). I added tiny text brushes (by sanami276) under the frame.
And you’re done!
Please PM me if you have any questions.
------------------
GIMP Tutorial #8
Requested by nz_narnia_nut. I’m not sure if it’s translatable.
Going from this  to this
  , recreating this
  .
.
Open your image and crop/scale. (I’m using a screen-cap from SpareOom.net.)
Duplicate base, set to Screen 100%. Add New Layer from Visible (Layers>New from Visible) and set that to Soft Light 100%. Change the Screen layer’s opacity to 50%. Flatten image.
Add a fill layer of 2b0924. Set it to Screen 100% and duplicate it twice (resulting in three Screen layers. Set the top layer to Subtract 100% (resulting in 2 Screen layers and a Subtract layer on top). This is the same as a single layer of Exclusion in other programs. Add a fill layer of f3ebf3 and set that to Burn 100%. Flatten image.
Set the Red Saturation to +60. (Variation: Only raise the Red Saturation to 30 or 40 and raise the Yellow Saturation to 20 or 30. This may vary depending on what works for your image.)
Duplicate base, set to Screen 30%.
Add a new layer from Visible. Open the Filter Pack (Colors>Filter Pack) and input these settings (They sound a little strange, so PM me if you have any difficulty understanding).
Click on Saturation, click More Sat in the new window that will open up. X out of that.
Click on Hue, click on Red and Cyan. X out of that new window.
Click on Value, click on Lighter. X out of that window.
Click Okay.
Set to Saturation 50%. Flatten image.
Add this gradient  (not sure who it's by). Set it to Lighten Only 60%. (Variation: I left it on 100% on a few icons because I liked the way it looked.) For signatures, I scaled it to 300x300 and moved it so the red part was showing as much or little as I liked.
Duplicate base layer and raise it to the top. Set it to Soft Light 50%.
Add this texture  (not sure who it's by). Set that to Screen 50%. (Variation: You may prefer to leave it on 100% opacity, whatever works for your image.)
Flatten image. You can add more textures/brushes/text if you want.
And you’re finished!
Please do not copy exactly.
Other examples of this exact coloring:


Examples of tiny variations in this coloring:


Please PM me if you have any questions.
She hoped to be wise and reasonable in time; but alas!
She must confess to herself that she was not wise yet.
Call me Maddy! | my livejournal
Proud Attolian Recruiter
Posted : September 28, 2009 9:04 am
Tutorial #19—Green and Pink coloring
Requested by lover of narnia
Going from this:  to this:
a recreation of this: 
PM me if you have any questions!
~Wunder
"The task of the modern educator is not to cut down jungles but to irrigate deserts." ~ C. S. Lewis, The Abolition of Man
Forum 1.0: 1303 posts
WC: 42
Posted : September 28, 2009 12:48 pm
Tutorial #16: Go from this: 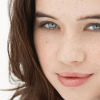 To this:
 ![]()
A recreation of this: ![]()
Requested by MissAdventure.
Open your image. Crop and scale if needed.
Add a fill layer of #dcedf6 on Burn at 100% opacity.
Add a layer of #ffffff (white), and set it on Overlay, add a layer mask to that layer, go to Colors>Invert.
Flatten (I don't have this written out in my tutorial, so I'm not sure if I did it...).
Go to Colors>Components>Channel Mixer.
Enjoy!
~Djaq
900 posts!!! 
When things fall apart, be glue.
Team Hoodie!!
Posted : September 29, 2009 8:12 am
Tutorial #20—Purple Coloring
Requested by MissAdventure
Made in GIMP, fully translatable
Going from this:  to this:
a recreation of this: 
PM me if you have any questions!
~Wunder
"The task of the modern educator is not to cut down jungles but to irrigate deserts." ~ C. S. Lewis, The Abolition of Man
Forum 1.0: 1303 posts
WC: 42
Posted : September 29, 2009 11:08 am
Tutorial #46 - This to this: ![]() recreating this:
recreating this: ![]() using Gimp. Translatable.
using Gimp. Translatable.
Requested by Eruceninde.
This tutorial is similar to my 45th tutorial, but a few of the steps are different.
Open and prep image/base (crop, scale, etc.). I'm using a screencap that I took from Gods and Generals. I cropped it like this: ![]()
Duplicate the base layer and go to Colors>Auto>White Balance (I believe this is known as 'Auto Levels' on Photoshop). Set the layer mode to Screen at 100%.
Duplicate that layer, set the layer mode to Soft Light at 100%. Add a layer mask, copy and paste the background layer into it. (I'm not sure how to do this on Photoshop. Ask WunderLu.  )
)
Add a fill layer of color #2a1409, set it to Subtract at 100%.
Flatten the image.
Duplicate the base layer and go to Colors>Components>Channel Mixer and input these settings...
Red channel: +120, -40, +10.
Green channel: -10, +50, +70.
Blue channel: -40, +50, +100.
Make sure that Preserve Luminosity is checked. Click ok.
Set that layer to Soft Light at 50%. Add a layer mask, copy and paste the background layer into it.
Duplicate the above layer and set it to Screen at 100%. (It should already have a layer mask on it. Invert the layer mask.)
Add a fill layer of color #ffffff, set it on Soft Light at 50%. Add a layer mask, copy and paste the background layer into it. Now invert the layer mask.
Add a fill layer of color #2a1409, set it to Screen at 100%.
Add a fill layer of color #2a1409, set it to Soft Light at 100%.
Add a fill layer of color #2a1409, set it to Subtract at 50%. Add a layer mask, copy and paste the background layer into it.
Flatten the image.
Go to Colors>Color Balance and input these settings...
Shadows: -10, 0, +10.
Midtones: +15, 0, -5.
Highlights: +5, 0, -5.
Make sure that Preserve Luminosity is unchecked.
If you're happy with that, click ok.
Go to Colors>Hue-Saturation, set the Master saturation to +10.
Add a fill layer of color #f00d0d, set it to Grain Extract at 10%. Add a layer mask, copy and paste the background layer into it.
Add a fill layer of color #324040, set it to Lighten Only at 75%.
Flatten your image.
Go to Filters>Enhance>Sharpen and sharpen it to your liking.
Add whatever else you want! I blurred the background and added a red light texture.
You're done!
Please do not copy exactly.
--- flambeau
President of the Manalive Conspiracy
Founder of Team Hoodie
Icon by me
Posted : October 2, 2009 7:59 am
Tutorial #17: For GIMP, should be translatable.
How to get this: ![]() Recreating this:
Recreating this: ![]()
Requested by Wunderkind_Lucy.
Open your base/image. (I'm using a base from spareoom.net!)
Add a fill layer of #ffffff, set it on Overlay at 100% opacity. Merge down.
Go to Colors>Components>Channel Mixer
Red: 90, -20, 0.
Green: -10, 40, 60.
Blue: -50, 80, 60.
Set that layer on Screen at 50%, duplicate it and set it on Overlay at 65%.
Flatten.
Go to Colors>Hue-Saturation:
M: +25. B: +100. C: +25.
Go to Colors>Levels:
Leave the Value channel as it is, go to the red channel and use these:
Input: 0, 0.45, 255. Output: 0, 220.
Green - Input: 30, 1.01, 225. Output: 0, 255.
Blue - 0, 2.50, 255. Output: 0, 175.
Click 'ok'.
Merge down.
Duplicate your base layer, go to your Channel Mixer again, and it should still have the coordinates that you used last time, but if not, just use the ones that I listed before. Set that layer on Burn at 25%.
Add two fill layers of #decdf6, set them both on Burn.
#e0c4a1, set it on Multiply at 75%. Add a layer mask to it, copy and paste the base layer into it.
Now we'll add some textures.
This one:  Set it on Screen at 35%. To soften the look of the texture, but still have the colors, I go to Filters>Blur>Gaussian blur, and I do that to about 25.
And this one:  Set it on Screen at 65%. I did the same Gaussian blur as on the one before. Colors>Desaturate>Luminosity. Add a layer mask to it, copy and paste the base into it as well.
Flatten or merge all the layers together.
Colors>Brightness-Contrast: Set the brightness to -20, and the contrast to +20.
Duplicate the base layer, set it on Screen at 50%, add a layer mask, copy and paste the background into it, invert the mask (Colors>Invert).
Add this texture:  (I flipped it horizontally, and inverted it) Set it on Screen.
We're going to add fill layers again. 
#e0c4a1, on Multiply at 35%. Add a layer mask, copy and paste the base into it. I had to smudge Peter with the smudge tool (the one that's a finger) on the layer mask, so that he didn't show up on it.
#dcedf6 on Multiply as well at 65%, add a layer mask and copy and paste the background into it.
Flatten. Sharpen and blur if you like.
Add whatever else you like, and you're done!!
I'm sorry that it's not very accurate.  It's as close as I could get it. I'm also sorry that it has more layer masks than a Halloween party.
  (yes, lame...)
If you have any questions or comments, please call this num--uh, let me know, k?
Enjoy!
~Djaq
When things fall apart, be glue.
Team Hoodie!!
Posted : October 2, 2009 1:41 pm
Here is a tutorial from me, requested by Djaq.
Anna Popplewell Icon Tutorial for GIMP 2.2
from this: to this:
A recreation of this:
Crop, scale, sharpen, and smooth image as desired.
Duplicate your image and set it to soft light, 100%.
Duplicate picture again and drag it to the top. Go to Layer>Colors>Auto>Color Enhance. Set the layer to screen, 100%. Duplicate the layer and lower the opacity to 30%. Duplicate this layer and set it to soft light, 100%.
Create three new layers and fill them with color #000b36. Set the first two layers to screen, 100%, and the last to subtract, 100%. (In other programs, this is exclusion.)
Create a new layer and fill it with color #5290de. Set the layer to soft light, 60%.
Duplicate your image (NOT the color enhanced one) and drag it to the top. Go to
Layer>Colors>Color Balance. Here are the settings:
Shadows: 0, 0, 0
Midtones: 10, 0, 50
Highlights: 0, 0, 0
Click OK. Set layer to soft light, 100%.
Duplicate your image again and bring it to the top. Set it to soft light, 30%.
Create a new layer and fill it with color #e0ebf9. Set it to Multiply, 100%.
Create a new layer and fill it wih color #f4ebde. Set it to Multiply, 100%.
Merge all layers.
PM me with any questions. Enjoy!
Sam in the NW Hobbit Clan!
NW sibs=Juliana, AWH, Shur'tugal, Unicorn, hungarianarnia, Todd
"And now, Harry, let us step out into the night and pursue that flighty temptress, adventure." - HBP
Posted : October 4, 2009 8:06 pm
Tutorial #21—Copper Curls
Requested by LucyP0104
Made in GIMP, fully translatable (and how to use layer masks in Photoshop)
Going from this:  to this:
  a recreation of this:
PM me if you have any questions!
~Wunder
"The task of the modern educator is not to cut down jungles but to irrigate deserts." ~ C. S. Lewis, The Abolition of Man
Forum 1.0: 1303 posts
WC: 42
Posted : October 5, 2009 12:20 pm
Tutorial #47 - This: ![]() to this:
to this: ![]() recreating this:
recreating this: ![]() using Gimp. Translatable.
using Gimp. Translatable.
Requested by lover of narnia.
Open and prep image/base (crop, scale, etc.).
Add a fill layer of color #fef3f4, set it to Soft Light at 10%. Merge to the base layer.
Go to Colors>Hue-Saturation and input these settings...
Master: +25
Red: +35
Yellow: -40
Green: +50
Cyan: +50
(I also set the 'Overlap' option to +25. I don't know if other programs have that option, but that's what I did on Gimp. It helps 'soften' the harsh edges caused by upping the Reds and lowering the Yellows)
Add a fill layer of color #090f2b, set it to Screen at 50%.
Add a fill layer of color #b7eefa, set it to Soft Light at 50%.
Duplicate the base layer and bring it to the top of the stack. Set it to Soft Light at 100%. With that layer selected, go to Colors>Hue-Saturation and set the Master Hue to -15 and the Saturation to +25.
Add a fill layer of color #d6cba5, set it to Divide at 25%.
Add a fill layer of color #ffffff, set it to Soft Light at 100%. Add a layer mask, copy and paste the background layer into it. Now invert the layer mask.
Flatten your image.
Duplicate your base layer. Desaturate that layer (Colors>Desaturate), and then invert it (Colors>Invert). Set that layer mode to Soft Light at 35%.
Flatten your image.
Go to Filters>Enhance>Sharpen and sharpen your image to your liking.
Select the Blur/Sharpen tool and selectively blur his face.
(I didn't sharpen or blur my recreation cause I was lazy. )
Add this:  (credit: Daylight) set it to Lighten Only at 75%.
Add whatever else you want! I added a radial blur (Filters>Blur>Motion Blur), a couple light textures set on Screen, and some tiny text.
You're done!
Please do not copy exactly.
--- flambeau
President of the Manalive Conspiracy
Founder of Team Hoodie
Icon by me
Posted : October 5, 2009 3:14 pm
Tutorial #1-Blue Sparkly Coloring (requested by Wunderkind_Lucy)
From  to
to  recreating
  (I couldn't get it exact, but it's close.) GIMP. Might be translatable.
This is my first tutorial and it took me a very long time to figure the process out, so my apologies if the steps are a bit convoluted!
Open your image and crop, scale, etc. I used a base from spareoom.net.
Duplicate the base layer and set it to Screen at 40%.
Duplicate the base layer again and go to Colors>Auto>White Balance. Set to Screen at 100%.
Merge layers.
Add 2 fill layers of #dcedfe. Set first layer to Multiply at 100% and second layer to Overlay at 30%.
Add a fill layer of #fbf1e1, set to Overlay at 60%. Add layer mask, copy and paste background layer into it. Invert the layer mask.
Add a fill layer of #dcedfe, set to Burn at 30%.
Flatten image; go to Filters>Enhance>Sharpen and sharpen to your preference. (I sharpened mine to 20.)
Duplicate base layer and go to Colors>Hue-Saturation. Set the Master Saturation to 25 and the Master Hue to -5. Set both the Cyan and Blue saturation to 25.
Duplicate base layer again and go to Colors>Color Balance. Set Midtones to Cyan: -100.
Add a fill layer of #0e0b53. Set to Screen at 100%.
Add a fill layer of #fbf1e1. Set to Burn at 100%.
Open this texture  by cloaks from deviantart.com. Set to Overlay at 30%.
Open this texture  by hyaline12. Rotate 90 degrees to the right and set to Lighten Only at 100%.
Duplicate that layer and set to Overlay at 100%.
Open this texture:  by hyaline12. Set to Screen at 100%.
Flatten image; carefully blur her skin (rate:50), especially where the textures overlap. Sharpen her eyes and lips as much as you like and add whatever you choose!
Enjoy and please PM me if you have any questions!
the light after the storm
shows that hope was never gone
Snow After Fire graphics
Posted : October 5, 2009 6:18 pm